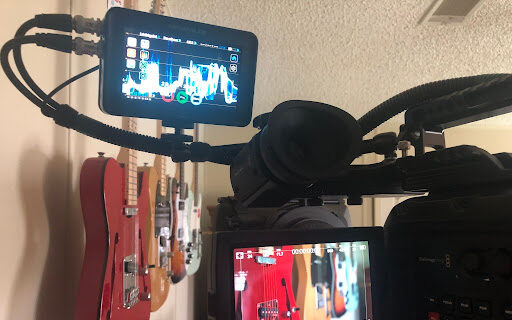
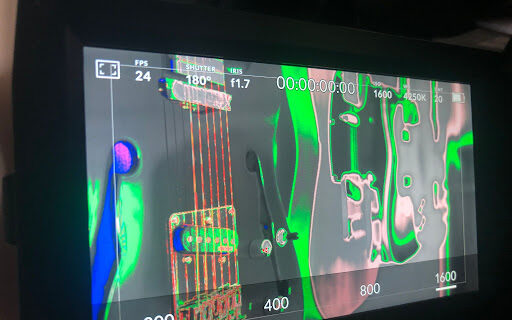
False color is one of many tools that make it easier for camera operators to evaluate exposures on set. The tool is also helpful for editors and colorists adjusting an image in post-production. False color displays a graphic representation of the brightness range in an image. To do this, it assigns arbitrary color values to different levels of luminance in the image frame.
For cameras with the false color function, these colors show up on your on-board LCD or EVF. However, it’s also a common feature for external monitors. Editing programs often offer false color monitoring assists, as well. This allows you to evaluate and match exposures between shots on a timeline.

What are the benefits to using false color?
False color is perhaps the easiest method to understand the luminance values within particular areas in the frame. These values correlate with the image exposure coming from the camera’s sensor.
Much like zebras can measure highlights in an image from 75 to 100%, or the way a histogram shows us the range of values on a value scale where left side peaks indicate highlight details and right side peaks indicate shadows–false colors show us the range of brightness values present in the image. They can also tell us where, and when to expect digital noise to be present in the image
Unlike a false color overlay, the “blob” on a waveform monitor is less revealing of the framing and composition of a shot. Only the light response registers on the IRE scale, like a ghost image of the actual scene. Objects from the frame show up as an aurora of their grey-scale values, without any depiction of details or colors.
If you’re uncomfortable using a light meter to build a mental picture of the light levels on set, false color can help evaluating light levels in a more visual manner, directly corresponding to details within the frame.

What does false color show us?
False color compares the relative luminance values from sampling data on a colored scale representing IREs from 0 to 100%. The Institute of Radio Engineers developed the IRE scale in the 1950s. It measures an amplified electronic signal to denote the overall energy (in Mv.) of a video signal.
This is the same type of sampling data exhibited by the aura of a waveform monitor. Zero percent on a waveform monitor represents no light being converted into an electronic signal. Then, 100 represents the highest energy state on the sensor. This is where the most amount of light is being converted to image data from the chip.


The false color matrix overlays onto the video image using a range of reference colors to “fill in” areas of the image at different IREs (illustrated below). Usually, there are six or more hues that show the range of brightness over all parts of the video frame.


Looking at luminance levels
A typical scene will register luminance values between 10 and 85 IRE with absolute black residing below 10%, and absolute white values residing between 86 and 96%. As the IRE value approaches 100, the details retained in the highlights of the image become less and less – until the point of clipping. That’s where no detail remains in the highlights at all.
“Middle grey,” or 18% grey (as in a grey card) falls between 48 and 52 IRE. Proper skin tone registers anywhere from 42 and 78 IRE depending on the reflectance. So, a good skin tone might appear bright purple (or pink), light grey, or green respectively, according to the reference chart.
Values in the 0 to 7% range, represented here in white, are known as “super-black” values. These areas have no light and no color information in the file. Values in the 100 to 108 range of the false color scale, represented by the color red, demonstrate “super-white” areas where no color shading or details. This zone is also referred to as the “clipping” zone. Usable highlights will show as yellow.


Properly exposing for your subject
Knowing the proper IRE value range for flesh is key. On a traditional waveform monitor the “flesh line” is at 55 to 60 IRE. However, white skin renders best at 60 to 70, while brown skin may show better at 48 to 52 IRE. Darker subjects or scenes may render best at 40 to 48 IRE in order to keep other values in check, like shadows and highlight details.
Initially, it can be hard to get used to which colors represent which IRE levels from 0 to 100%. Using both a false color monitor, and a waveform monitor in conjunction would provide the best understanding of image exposure in an active shooting environment.

Limitations of the false color overlay
Any false color overlay tells you how bright objects are on a screen using the IRE scale. However, it does not actually tell you how bright your light sources are, how many foot-candles are present on a film set, or what f-stop will expose your subject correctly. F-stops are determined by evaluating the image on a monitor. Then, selecting an f-stop based on the color reaction.
While the values on the false color assistant do change based on the active ISO set on the camera, false color does not correlate the IRE values with ISOs directly. However, note that “middle grey” often occurs at the same IRE and color value across several ISO settings within the same camera package.

If you know the desired IRE value range for the subject (like middle grey), it is a simple matter to roll the aperture open, or closed until the desired color washes over the portion of the image you’re concerned about.
If however, if you need a specific f-stop, the process of arriving at the desired IRE color might involve tweaking lights, or making other camera adjustments like ISO corrections to get the desired final effect.


False color vs SMPTE
Don’t confuse the colors of the false color matrix with the hues applied by color bars or chip charts. The colors do not correlate.
Those tools offer SMPTE standard hues and saturation values for proper color rendering in a broadcast setting. False color merely represents dynamic range in the image using arbitrary colors to differentiate between grey-scale values.
These colors are not in any particular order, aside from their descending order of intensity as they correspond to the sampling rate of a waveform.

How can filmmakers best utilize false color to have a positive impact on their next project
Unlike simply using any inspection monitor on set to judge the effectiveness of a video image, false color uses the pixel data directly from the camera sensor to establish the integrity of the values present in the video file. It demonstrates them using a colorful reference scale that can be interpreted using a color-coded key provided by the camera manufacturer, or monitor manufacturer respectively.
Video images that avoid areas of white/black clip, that is to say, areas in the image with no retrievable image detail, are the gold standard for professional clients. Particularly those who commission video images for broadcast. Those images must comply with the strictest standards for image clarity, contrast and color saturation.
If you’re not inclined to employ the old-school method of using a light meter to evaluate the amount of light present in a scene and how it reflects off the subject, then using false color and a waveform monitor are the next best techniques available for creating optimally exposed images with digital cinema cameras.


