When you're lighting two subjects in the same shot, the problem isn't how to do it but which approach to choose. Lighting methods are driven by the location you're in, the style you're creating, and the number (and type) of lights you have. With all those variables, there's at least a dozen ways to go; so we'll look at just five representative setups, all of them suitable for a two-person interview or a two-shot in a narrative.
Whether you're using one instrument or eight, the basic procedure is the same:
Establish a key light for each person.
Fill the opposite side of each face with a less intense light.
Separate the subjects from the background behind them.
Light that background so that it's neither a distraction from the subjects nor a black hole behind them.
Adjust the placement and height of all the lights to keep multiple shadows out of the shot.
If you were lighting Rhett and Scarlet you'd use separate instruments for every one of these steps — and we'll show you how to do that. But you can also light two people attractively with a single light, or two, or three, or….
So let's get to it. By the way, we'll assume that you're using movie lights exclusively, with no help from daylight or lights that belong to the location. We'll also take it for granted that the two subjects are "opened up" to the camera, rather than facing each other squarely, so that each can have both key and fill lights.
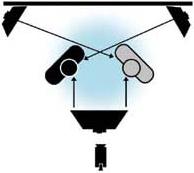
One- and Two-Light Setups As Figure 1 shows, you can do the job with a single light, as long as it's a very large, soft source. A softbox or pan full of fluorescents works best, or you can use a "broad" floodlight or even a spotlight, as long as you aim it through a big sheet of spun glass or translucent white gel. (Umbrella lights often don't work because their light doesn't "wrap around" subjects well.)Figure 1 – One Light
This layout also depends on a light-colored wall or curtain backing to bounce the light back on to the subjects. That way, the large source light will key both subjects and the reflected light delivers the fill.
As you look at Figure 1, notice that the light and the subjects are close to the backing. That way, the light provides some illumination for the background, while the shadows thrown by the subjects are too soft to be objectionable.
You can achieve a similar effect with two spotlights instead of a single large source. Keep the lamps quite close together so that the two subjects seem to be lit by a single source. Again, fill light bounces off a light-colored backing close behind them.
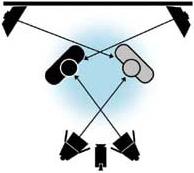
If the background can remain moderately dark, you can sometimes create a striking two-light design as shown in Figure 2. Figure 2 – Two LightsThe large source light keys both subjects, while the spotlight, raking across at an oblique angle, provides a combination fill and back light. In this setup, the subject on the left (closer to the key light) is more prominent because it is slightly brighter.
Three- and Four-Light Setups By adding a third light, you can create a more balanced form of this design (Figure 3). Figure 3 – Three LightsNote that the soft keys light both subjects equally, while the matched pair of broad lights delivers combined fill and back light. In this design, the broads can also splash an interesting light on the background.
You can create a more conventional three-light design by treating the two subjects as if they were only one. Place a fairly high key light at eight o'clock and a fill light opposite, at 4 o'clock. Raise the rear light and adjust it so that it provides both back light and background light.Figure 4 – Four Lights
Figure 4 shows a design much like that of Figure 3, except that individual key spots replace the single soft light. When using paired keys close together like this, take special care to keep multiple shadows off the background.
Hollywood, Here We Come! So far, the oblique-angle lights have done double duty as both fill and back lights. If you have the instruments (and the juice to power them) you can give each subject a classic three-light setup of key, fill, and back lights.
Since we must be on a sound stage by now, let's go whole hog. Figure 5 adds a light dedicated solely to punching up the background. On the opposite side, a spotlight shooting through a silhouette pattern ("cookie") throws an interesting design on the wall. In this kind of application, you may want to keep the cookie fairly close to its light, to soften the edges of the pattern.Figure 5 – Studio Lights
As you can see from Figure 5, the front key lights are placed some distance apart because, in this obvious studio setting, you don't have to pretend that both subjects are illuminated by the same source.
I'm Ready for My Closeup Two-shots don't stay interesting for very long, so you'll want close-ups of both subjects. The easiest way to get them is to push in with the zoom lens for tighter angles. By doing this, you avoid having to re-light, and, in a two-camera shoot, Camera A can re-frame in real time while Camera B is online.
The down side is that just zooming in creates, at best, a very similar perspective on the subject and, at worst, a jump cut. In single camera shoots, it's often worth the effort to re-light for the close-ups (Figure 6).Figure 6 – Cheating
With only one subject to handle, you can fine-tune your lighting. Don't change it too much, however, because your key, fill, and back light angles should replicate the look of the two-shot. Still, as long as you don't reverse key and fill sides or swap punchy, theatrical spotlights for soft, naturalistic "window light," you can get away with a lot in refining your scheme for close-ups.
In Figure 6, notice that the subject is close to a side wall. Hey! Where did that come from all of a sudden? The answer is that on location (or a hard-walled set) you can "cheat" subjects to create more photogenic backgrounds for their close-ups. Since side walls are not visible in the two shots, viewers have no way to tell where they are, or even if they exist. Often, you'll find that lighting into a corner can produce a more interesting design.
What's My Motivation Here? The designs considered so far are well suited for interviews, demonstrations, news desks and similar nonfiction applications. Things get a bit more complex when you move into story videos, because your lighting has to look more or less realistic.
The trick is to identify the "motivating light." This is often a "practical" (a light source that appears on screen) like a hanging table light, a desk lamp, or even a fireplace. Your job is to emulate that motivating light with your key light(s) and then fill and separate your subjects with unobtrusive additions.
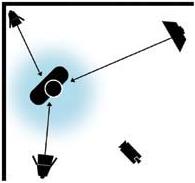
Suppose, for instance, the scene is a poker game in a western saloon. The motivating light is hanging over the center of the circular table, (Figure 7) so every subject gets a key light that's higher than usual and dead front (get Black Bart to take that ten-gallon hat off).
It's easy to separate subjects from the background with imitation "saloon lights" established in previous wide shots. Fill light, however, is more difficult. To look realistic, each subject should be filled from low and in front, by light apparently bouncing off the poker table. Since doing that would turn everybody poker-felt green, try placing a white circular cardboard reflector, sized about two feet smaller than the table top right in the center, leaving a one-foot ring of green cloth in front of each player. By framing off the white table center, you can aim a spot straight down at it to create convincing bounce fill from the "hanging light."
Incidentally, it's a bit off-topic, but don't forget to set white balance for normal color rendition. You can dial in your atmospheric oil lantern colors in post.
In a setup like this, you don't try to fully light more than maybe two adjacent players at a time. However, you'll probably be framing subjects across the table over the shoulders of foreground players. To light these backs and shoulders, you'll want fill light that's a stop or two darker than the key light on the featured subjects. For that extra touch of realism, have a crewmember pass a flag in front of the fill light occasionally, to simulate movement elsewhere in the saloon.
Good shooting!
Contributing Editor Jim Stinson is the author of the book Video Communication and Production.