
In ancient times, mankind practiced the mysterious ritual of audio dubbing to videotape. With fear and trepidation, video editors pressed the Audio Dub button on their recorders and prayed to the gods that everything would work. This required a level of skill and craftsmanship that is unknown in the modern world. Today, most editors aren’t familiar with the term Audio Dubbing but they accomplish similar tasks with every project.
Get the Gear
The term dubbing has several meanings in the video world. In general, it means transferring media – audio in this case – to another medium or format. For our purposes, we’ll define audio dubbing as the practice of replacing or augmenting audio recorded during the original shoot. This happens so easily with computer editing that we often take it for granted.
Of course you’ll need some way to record the new audio to be dubbed and your choices are growing almost daily. One of your first choices could be recording on a computer – desktop, laptop or even a netbook. As long as the computer has a soundcard with a microphone jack, you’re in business. While audio quality is always an issue, it’s possible to record with many different microphones, from a simple external computer mic to various professional models. Remember that your computer mic jack doesn’t have professional-level phantom power, so that may limit your mic choices. You’ll also need an audio adapter or two.
If a computer isn’t portable enough for you, consider using your camera as an audio recorder. If you already record with external sources, all the equipment should be in place. Remember that many camcorders have Automatic Gain Control, or AGC, enabled by default. If you can turn it off, please do. If not, just know that it’s there and do a few tests to determine how it will affect your recordings.
One final option – and a growing category – is a portable, flash-based audio recorder. With options from all the major manufacturers, this may be the perfect accessory for field recording. Most have built-in stereo microphones recording to flash memory cards. This is a complete, handheld recording solution that will work with everything from sound effects recording, to music and even voice-overs.
Fire it Up

The first tendency is to just plug in and hit the record button, but there may be more to it than that. What if you’re recording from a source other than a microphone? The audio you need to record may come from some other device like a mixer, gaming console or musical instrument. What now? Start with the correct audio connections and/or adapters. Once that’s in place, it’s time to check your recording level. This is an important step. If the signal from your source is too low, the recording will be noisy. If the signal is too high, you’ll hear some nasty distortion on playback. Level setting with a camcorder or dedicated audio recorder is usually as simple as turning a dial or clicking a button or two until you have a good strong level. Recording to a computer is a little more complicated. Computer sound cards usually have a simple 1/8″ jack marked with a mic icon. This is perfect if you’re actually using a mic. There may also be another jack marked Line. This is for direct-connect sources like we mentioned above. If your sound card doesn’t have a line-input jack, don’t give up yet. Open the control panel for your sound card and look at the inputs and recording settings. The input may have an option to select between mic and line level. You may also see a high gain or boost mode for the input. Make sure that is turned off. To set a good recording level, plug in your mic or other device, hit the recording button on your software and watch to see what happens. If the signal shows as barely a blip on the meters or waveform display, adjust the input level to get more signal. Likewise, if the level is too high and the meters or display show full signal most of the time, turn the input slider down until you see a good average volume. Every sound card is different so dig around and see what options you have.
Doing the Dub
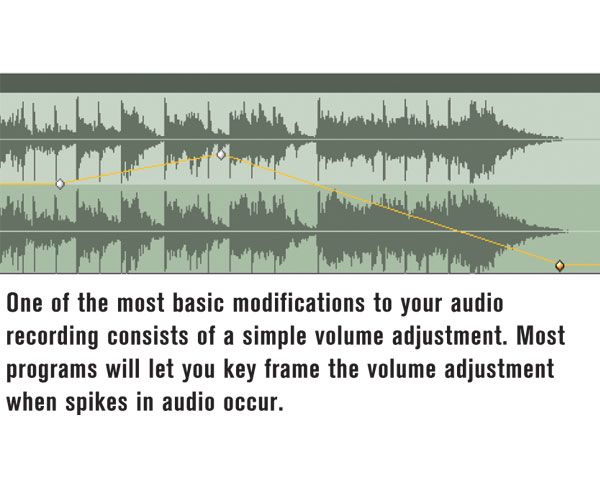
Once your new audio is recorded, you can slide it into your project or ‘dub’ it. Today, the process is as simple as dropping the recorded clip onto an audio track and sliding it around until it fits the project. Of course, there are other options too. The most basic modification is a simple volume adjustment. Open the mixer in your editing program and tweak until it sounds right in the mix. Maybe you need a volume change that happens over time, like a fade in/out or a temporary drop in volume for dialog. This is accomplished with keyframe ‘handles’ in the program if it offers it. Alternatively, time the transition you need and perform it in your audio software first. If you’re actually replacing audio recorded during the shoot, make sure to mute the original audio or turn its volume all the way down.
Don’t forget all the other available audio options like tone control, dynamics control and special effects like reverb and echo. These effects can make your audio dub sound like it was recorded over a telephone or in a cave – and everything in between.
Today’s video editing technology makes the age-old practice of audio dubbing obsolete. Those who came up during tape editing times will never lament its passing. It was a pain. The process of recording and re-recording audio has changed forever and that’s a very good thing.
Sidebar: Alternate Paths
After a few recordings with your computer sound card, you may decide the quality isn’t up to your standards. That’s fine, because most built-in sound cards lack that elusive professional sound. Fortunately, there are dozens – maybe hundreds – of external audio interfaces available today. Some work with USB while others use a FireWire interface, but all add higher quality inputs and outputs to your computer. We’ve seen very good interfaces starting at $30 but the majority fall in the $200 and up category. Analyze your production requirements and find an interface that fits your editing style and budget. You won’t regret it.
Contributing Editor Hal Robertson is a digital media producer and technology consultant.


