How do you mix the soundtrack for your video projects? There are several ways. You could normalize each track to some arbitrary volume level and leave it at that. Another option is exporting all the audio tracks individually, mixing them in an audio-only program and importing the resulting file back into the video project. You could also go in and microscopically adjust every little thing in your editing program until you get it perfect. All of these techniques are valid, but maybe you just need some basic control and don’t have the time or patience for other methods. If that’s the case, you need to learn to use the virtual mixing board in your editing program.
It’s Virtually Real

Every editing program uses a slightly different design, but most virtual mixers are based on their real-world cousins. At its most basic level, a physical mixing board has just a few controls – volume, pan and tone control. Those controls are multiplied by the number of channels in the mixer, but each does exactly the same thing. Learn one and you’ve learned them all. Real-world mixers – i.e. hardware mixers – also have a master section that includes a volume control. Many also have master pan controls and some form of metering to monitor overall levels. Other, more specialized mixer functions – like equalization and effects – are usually handled by software plug-ins.
In the hardware world, it doesn’t matter how many channels you need. If your mixing board has 24 channels, you’ll just have to ignore all the ones you don’t use. Conversely, if you run out of hardware channels, too bad. The nice thing about virtual mixers is that they automatically scale to fit your project. If your project has a dialog channel, a music channel and an effects channel, your virtual mixer will only show those three and no more. Less clutter means an easier mix. Through the use of plug-ins, each channel can have all the processing you need to get the job done. A hardware mixer is limited to what’s built in. Another advantage of a virtual mixer is the ability to save mixes. When you save the project, the mix is saved with it. Whether you come back to it tomorrow or next month, the mix is exactly the same way you left it. Finally, your virtual mixing board can handle any audio track or format that is supported by your Editing program software. There are no adapters, phantom power or patching workarounds.
Dialing It In

Virtual mixers mirror their hardware counterparts for a reason. If you’re already familiar with mixing in the real world, virtual mixing comes a little easier. However, mixing with a mouse can be a little counter-intuitive at first. Laptop track pads are even worse. Mixer volume sliders are simple enough though – just click and hold on the slider and move it up and down as needed. Knobs are a little more difficult. Some virtual knobs require you to click in the middle and move the mouse up and down to spin the virtual dial. Other virtual knobs make you click on (or around) the pointer and move around the dial to make adjustments. It pays to spend a little time learning how to navigate your virtual mixer. Once you’re comfortable adjusting everything, it’s easier to move forward on a project.
If you look at the individual channels on a hardware mixer, you’ll see decibel or db markings starting at infinity (no volume), going up to 0db and then 10 to 15 db above that. Normally, your channels prefer to operate somewhere around the 0db mark but it has plenty of room to add or subtract volume as needed. Your virtual mixer may or may not have the ability to add volume to a track. In the world of digital audio, there is an absolute maximum volume level. This is represented by the 0db mark. This makes sense if you think about it. If there are 16 bits assigned to any given digital audio sample, once all those bits change from zeros to ones, there’s no where else to go. The volume is maxed out. While the individual channels on your virtual mixing board may have adjustments above the 0db mark, it’s unlikely the master section will go above the 0db level. This keeps everything in check and indicates the maximum volume level for your mix.
Just like their real-world counterparts, virtual pan controls – whether knob or slider – move the sound left, right and everywhere in between the channels of a stereo mix. Pan controls make it easy to place your sounds in the stereo sound field. While dialog is usually in the center, you might want to move your sound effects around to indicate their onscreen locations. This is a creative option – almost an effect – and should be used with care, but the option is there to play with.
Plug It In

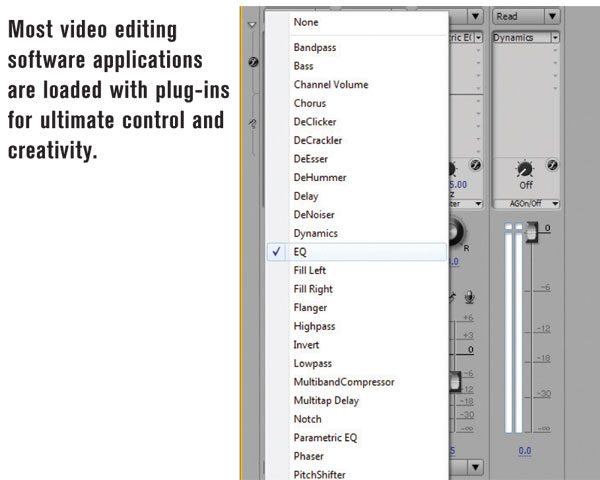
Compared to a hardware mixer, most virtual mixing boards look pretty plain. If volume and pan controls aren’t enough, it’s time to add some functions to the channel. Many editing programs offer plug-ins to add capabilities to their mixers. These plug-ins come in the form of equalizers, filters, reverb, echo and other processors. While the built-in effects are usually quite functional, they rarely match those available to audio-only applications.
If your editing program has the option, consider adding plug-ins from other suppliers. The most common plug-in format is called Virtual Studio Technology, abbreviated VST. VST plug-ins work cross-platform on Mac and PC and, if your software supports them, you’ve just opened a new world of signal processing options. Plug-ins are usually located in a common folder, and your editing program may give you the option of pointing to that folder. If not, it’s possible to paste copies of your plug-ins into the folder designated by your editing software. Once that’s done, open the plug-in option on your virtual mixer and choose the effect you need. Just like their hardware cousins, the many interfaces look exactly like the hardware they emulate. Using third-party plug-ins allows you to leverage world-class reverbs, compressors, limiters, filters and other effects that can add a new polish to your soundtrack.
Keep Listening

Regardless of the software, mixer or processing options you use, it’s still important to use your ears. Virtual mixing can feel a little strange at first, so compare your mixes using real speakers, (not the tinny ones that came with your computer), and headphones to verify your mix decisions. Use effects sparingly and keep individual elements balanced. Also, watch your master mixer section meters for overall volume. If it’s too low, boost it with the master slider. If everything is too loud, turn it down and, if necessary, plug in a master limiter to keep a lid on the final output volume. Your virtual mixing board is a powerful tool and will serve you well. It’s worth the time to learn it inside and out.
Sidebar: Virtual Surround Mixing
While a standard audio-for-video mix is in stereo, surround sound is an option with most video editing software today. When mixing in surround mode, the standard left/right pan control is replaced with a surround panner. Some surround panners look like a circle. Your sound is represented by a dot that you move around with the mouse. Other surround panners take the form of a box with markers for left, center, right, rear and subwoofer channels. Clicking on these boxes sends the sound to those surround channels. Surround sound is used on everything from commercials to video games, so it pays to investigate surround mixing with your software of choice.
Contributing Editor Hal Robertson is a digital media producer and technology consultant.


