The sections below reflect a reasonable set of expectations for a postproduction environment.
Metering
Since most of us work with digital systems, we will use them as a reference point. DAWs use dB FS as their metering scale. You should try to keep your mix between -12 and -9 dB FS, that way there is plenty of headroom left for any rare transients and most importantly for the mastering engineer to do their job. In analogue mixers, we often treat 0 dB as unity gain, in the digital world 0 dB is something to avoid at costs since it means that not only have you exceeded your headroom, but you have also clipped. Digital distortion is not a pleasant sounding thing. There is no added driver or warmness added to your mix, nor can it be completely removed; the best practice is to adhere to leave 9 to 12 dB FS of headroom.
The rest of this article covers setting up your mixing environment and playback levels in a way that allows your metering to make sense. It’s no use bringing up a level because it’s too low only to find out that you were playing your mix back at 50 dB SPL.
Equipment
The majority of post-production work will be done on a primary set of monitor speakers. Most production and recording facilities will use two sets of monitor speakers for comparison and selection. It is not uncommon for studios to have an inventory of speakers that can be swapped into a room upon request. Engineers also tend to have a preferred pair of monitor headphones to use during projects.
Speakers build up your stereo or surround image, deliver a better frequency response, and provide a less tiring means of monitoring playback, editing and mixing. The cumulative effect of a well-balanced room and high quality speakers allows you to experience the material as a whole. Headphones allow for a more intimate listening experience that lends itself to fine detail work, proof checking and confirming that your mix balance translates across correctly.
It’s no use saying that your project sounds great on one system and lacking on others. This neatly brings us to the tricky subject of translating your mix. Part of the reason for having access to multiple monitor speakers in the same room is to confirm that you are achieving the same mix across different systems. At the end of a session the mixing engineer should bounce mixes to either a CD or portable music player for playback on other systems — in this case do take your work home with you. Other systems should include cars, home stereos, that tinny sounding radio in your kitchen, generally speakers and headphones both big and small. You have done your job right if the core dynamics and balance of your mix is maintained across different systems. It is generally accepted that if a mix sounds good in a car then you are heading in the right direction.
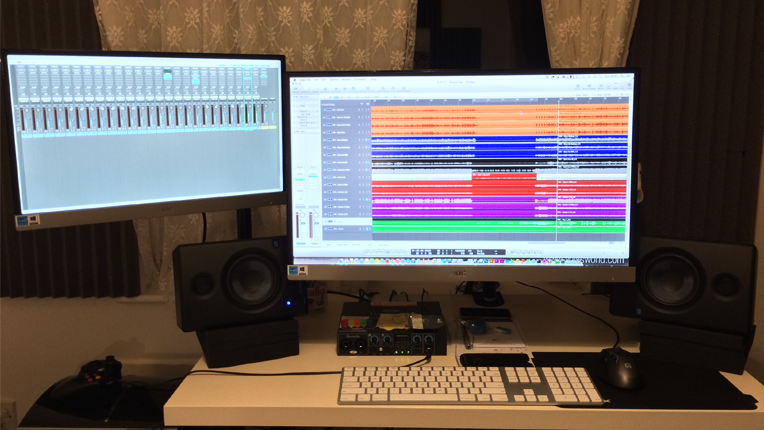
Figure 1. The Presonus Eris series monitors are a fairly recent addition to their product line and offer good value for money in smaller project setups.
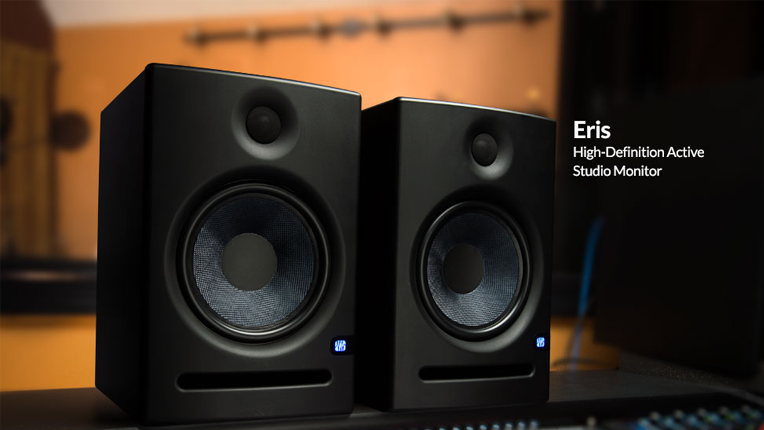
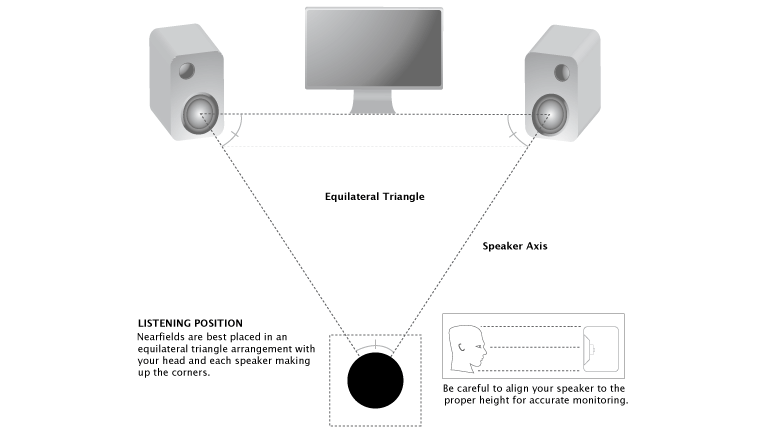
Figure 2. Place the speakers at ear level and space them apart as to form an equilateral triangle.
Speaker Set-up and Calibration
Calibrating your speaker levels and placement will require the following: band limited pink noise in mono at -20 dB FS (500 Hz – 2000 Hz), a decibel sound pressure level meter (SPL meter), a calibration microphone and an application capable of producing a sine wave sweep and corresponding readout (i.e. Fuzz Measure).
1. Place your speakers so that the drivers are at ear level
2. I recommend using some Auralex foam under your speakers to reduce the amount of mechanical noise transferred into your desk.
3. Space the speakers apart so that an equilateral triangle is formed between your listening position and the two speakers
- The distance between each speaker and your ears should be the same
- The speakers should be angled inwards by 60°
- Refer to your documentation to check if your speakers can be positioned either horizontally or vertically
4. Position the calibration microphone in relation to your listening position
5. Set your dB SPL meter to use:
- C weighting
- Slow response
- Measure relative to your listening position
6. Start playing back the pink noise
7. Calibrate each speaker separately
- Turn up the gain on that speaker or channel until your SPL meter reads 82.5 dB SPL
- Note and mark the level on the amplifier or speaker gain control
- Now either power off the speaker or bring the level all the way down
- Repeat the same with the other speaker by bringing it up to 82.5 dB SPL
- Power on or bring up the level of the other speaker to the previously noted level
8. Check your measurement
- The two speakers should now have a combined level of about 85 to 85.5 dB SPL
A general rule of thumb across audio equipment is the 12 to 2 o’ clock rule. When configuring your speakers, try to achieve your 85 dB SPL monitoring level at around the 12 to 2 o’clock region of the knob used to control your playback level. Do not be surprised or alarmed if you start to notice this pattern across a lot of audio gear when setting levels and gain.
Figure 3. You will need an SPL Meter capable of C weighting and slow response for an accurate level measurement.
Figure 4. While not directly relevant to monitor levels, the ability to measure the frequency response of your mixing space provides valuable insight. Pictured below is a Dayton EMM-6 microphone.
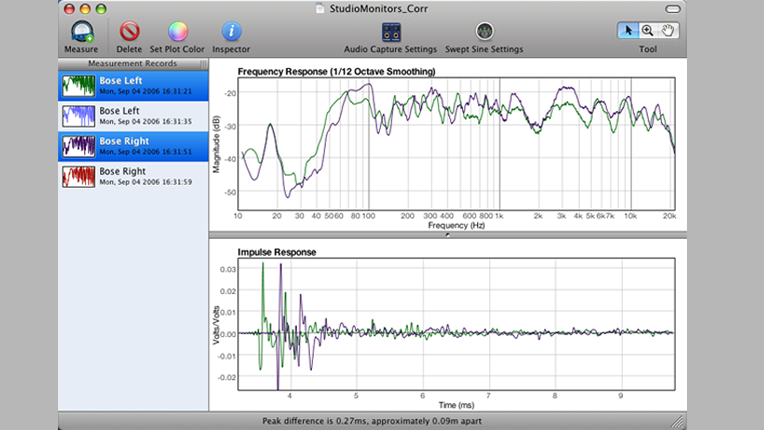
Figure 5. Fuzz Measure offers a free version that allows you take and compare measurements and produces an easy to read frequency response chart. Version 3.3.3 pictured below.
Levels
The recommended listening level for mixing is 85 dB SPL and can be safely maintained for up to four hours with a 15-minute break for your hearing. This level can vary depending on the size and make up of your room as well as the ability of the speakers to maintain that level. While 85 dB SPL is not what we can call conversational volume there is a very good reason for its use.
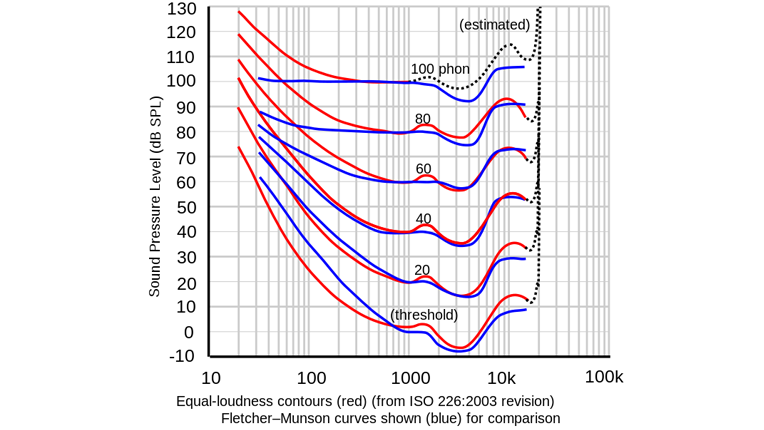
The Flether-Munsen curve is a wonderful bit of research that gives us insight into how we perceive loudness and frequencies at different levels. For our purposes the reason 85 dB SPL is the recommended monitoring level has to do with the difference in balance between frequencies being the least severe. When presented with two frequencies at the same level we will perceive the lower one as louder than the higher frequency. When material that has been mixed at 85 dB SPL is played back at higher or lower levels, the frequency relationships remain mostly intact. In the case of louder playback, the low and high frequencies will receive a boost, which is preferable since the mix gains some extra character.
Figure 6. The Fletcher-Munsen equal loudness curve. Our hearing is not flat and by design boost frequencies between 2 to 6 KHz. At 85 dB SPL that peak is somewhat reduced, with the response below 1 KHz being relatively flat.
The Room
At the end of the day what use is a bunch of great equipment if you have nowhere to put it? Additionally what good can your equipment do you if it is not set up correctly? With project studios being today’s standard for a lot musicians, producers, and engineers it is crucial that we can make the most of out what we have.
When it comes to speakers, I suggest picking a pair that will work with your space. Setting up a monitor pair with 8-inch drivers and a subwoofer in a small room is just asking for trouble.
My Story
I moved to England last year and that involved its fair share of adjustments, one of them being not having daily access to a recording studio.
With client projects on the horizon, I started to consider my options on converting a 9’ x 9’ x 9’ cube of a room into a working listening environment. My starting point was the previously mentioned cube shaped room with a wooden floor, plastered walls and ceiling, a window on one side, a door on the other, the two exterior walls being densely insulated and two insulated interior walls — hardly an ideal candidate.
The first step was to pick a listening position and to the listener with as much direct sound as possible while keeping reflections away.
Room symmetry was reduced with furniture that included a desk, couch, cupboards, shelves, a bookcase and finally a rug for the floor. Altering the sonic qualities of a room requires a combined approach that starts with the physical construction and design of the space, adding mass to the existing structure by means of extra insulation and wall panels, adding acoustic absorbers and diffusers, and, to some extent, recent advances in speakers that use DSP to set their frequency response counter to that of the room.
Going back to my setup, I mass loaded the room with different types of furniture that also has an effect on the room’s reflectivity by making the surfaces less uniform. I then applied 24 acoustic foam panels to parts of the walls, ceiling, and door. Each panel is 2’ x 2’ in size. Panels were placed behind the speakers, on the ceiling directly above my listening position, on the wall behind me, and the door. After some trial and error the resulting placement eliminated any slap back echoes in proximity of the listener and sufficiently diffused unwanted sounds from coming back to the listening position. Since the wall behind the listening position is un-insulated, low frequencies will pass through relatively easily into the next room. This limits the amount of bass build up in my room. The diffusers achieve the combined effect of shifting the room mode further back into the room and limiting unwanted reflections. The end result is a setup that allows me to mix a project to the point where the mastering engineer is happy with the product.
Figure 7. My project setup, I chose the smaller Presonus Eris E 4.5 monitors because they suited the room and desk footprint.
Blag Ivanov has a B.A. in Recording Arts from California State University Chico. He is a sound engineer and web developer with a love for music and tinkering in his spare time.


