
The biggest advantage to shooting raw is that the color of the images produced is unaltered so the highest image quality possible from the camera is maintained. The downside of working with raw files is that they take up more storage space than processed/compressed video. Additionally, the post production workflow can be much slower and more complex.
Find The Flow That’s Best For You
Once you know you want the benefits of shooting in raw, you need to decide your other priorities. Do you need to get your cuts out as fast as possible? Do you need the most control over luts and color correction? Do you need to control storage costs because you’re shooting a lot of footage? These are some of the factors that will help you build a raw workflow, from camera to final encoding, that works for you.
Raw, Uncompressed, Compressed: What's The Difference?
When a digital video camera captures in raw, it’s taking the unaltered data created by the camera's image sensor and recording it. Raw footage can be compressed or uncompressed so it’s easier to think of the footage as being processed or raw (unprocessed).
Uncompressed footage is created when the data from the image sensor is processed or altered so that it can be recorded in a file format like .mov or .avi. The color information in uncompressed footage is usually recorded in a different format from what the camera’s image sensor captured, which can cause a loss of image quality.
Raw footage can give you immense image quality, making things like color correction and effects work much easier.
Compressed footage is captured the same way as uncompressed footage, but compression like H.264 or MPEG-2 is added to reduce the file size. Depending on the amount of compression used, image quality loss can range from slight to very severe. Typically, a compressed video file will have loss of image quality from what the camera's image sensor sees; an uncompressed file will have a small amount of image quality loss, and a raw file will have little-to-no loss of image quality.
There are two main types of file compression, lossless and lossy. Lossless compression reduces the file size but retains full data quality. All the original information remains intact. Lossy compression eliminates portions of the original file to save space so only some of the original data is intact. File compression that is said to produce “visually lossless” video files makes files that only “look” the same as the originals. With visually lossless compression, some of the original data is lost so it really is a lossy type of compression. Doing major color correction or effects work on visually lossless or other lossy compressed files can be difficult because of the data loss.
The Cameras
When you look at what camera to shoot a project with, you should start by thinking about how the images it produces will support your story. How does the camera reproduce color and contrast? You should look at both color corrected and uncorrected footage from any camera you’re considering to see if it can produce the types of images you’re looking for.
Next, you’ll want to think about how your audience will see your production. It may only be in HD now, but you may want to show it or other projects in 4K in the future.
The one aspect of cameras that is often overlooked is how they fit into your whole workflow. A camera that is hard to operate can slow down your shoot or cause you to miss shots entirely in a run-and-gun environment. Likewise, a camera that captures in a file format that is hard to work with can slow down your post-production and cause you to miss deadlines. How you operate a camera, the media it records to and the types of video files it creates all affect your production workflow.
Currently, there are a number of affordable cameras that shoot in raw. Here are a few of the cameras sorted by their respective raw files that are currently available:
CinemaDNG
At $995, the Blackmagic Pocket Cinema Camera (BMPCC) is the cheapest camera capable of shooting 1080p raw video, but the small body can make it challenging to operate. The low cost of the SD cards it records to will help you save money, but the short record times they support means you may spend a lot of time changing cards. If you’re looking for a low cost way to shoot CinemaDNG or need a raw camera that’s the size of a point and shoot still camera, the BMPCC is worth looking at.
The Blackmagic Cinema Camera (BMCC) records 2.5K (2432 x 1366) resolution in raw to standard 2.5” SSD drives. The camera comes with DaVinci Resolve and UltraScope software which by themselves are worth the $1995 retail price. The BMCC, however, is not without its challenges. It has a low resolution LCD monitor that’s hard to see detail in, and it lacks a removable battery so an external power source must be used for all but very short shoots. The low retail price and ease of capturing from SSDs makes the BMCC an interesting option.
The Blackmagic Production Camera 4K (BMPC) shoots UltraHD (3840 x 2160) resolution in compressed CinemaDNG and retails for $3995. The BMPC has the same camera body as the BMCC and shares the same LCD screen and battery limitations, but it also comes with the same software. Many of the BMPC users are seeing large amounts of video noise in the under exposed sections of images captured in CinemaDNG. The BMPC is one of the most affordable cameras shooting 4K raw, but it may only be suited for brightly lit shots when recording in raw.
The Digital Bolex D16 can shoot raw, uncompressed CinemaDNG at resolutions of 2K (2048 x 1152 ) or HD (1920 x 1080). The camera’s non-removable battery and SSD make it better suited for shorter takes, although the dual CF card slots do add some flexibly. Currently the D16 supports a maximum frame rate of 25fps and maximum ISO of 400. The D16 has a $3,299 base price putting it within reach of many filmmakers. 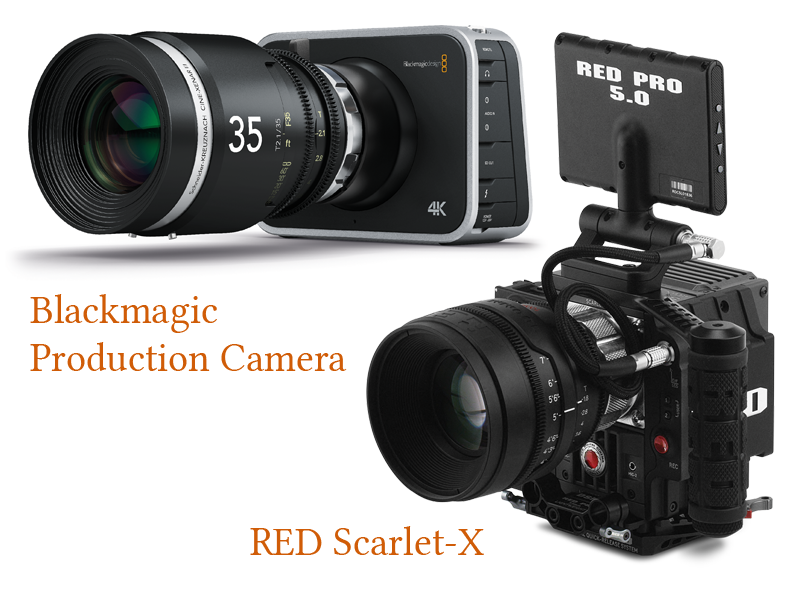
REDCODE
The RED Scarlet-X can record raw REDCODE at 1080p, 2K, 3K, and 4K resolutions. The Scarlet-X is a true cinema camera, sharing the same image sensor options as the top of the line RED Epic. While the Scarlet-X is more expensive than other options (packages start around $10,000), the REDCODE files recorded are much smaller than other raw formats which means you’ll save on storage. REDCODE is also natively supported by all of the major video editing software programs and can be edited on a laptop. If you do a lot of shooting, the Scarlet-X is well worth the investment and could even be cheaper in the long run.
Magic Lantern Raw
The Canon 5D Mark III, with a free add-on firmware from Magic Lantern, allows users to shoot HD (1920 x 1080) raw uncompressed footage at 24fps. The size of the large raw files created by the 5D Mark III and its CF card recording format limit the length of which clips can be recorded. Currently, there is no native video editing support for the raw files so they must be transcoded before editing. The Canon 5D Mark III retails for $3,399.
Media Can Make a Difference
While at first it may not seem to matter what media a camera captures to, it can make a huge difference on how much you spend on media and how long it takes to capture footage. Cheaper media can help your budget, but long capture times can slow down your whole workflow.
SD and CF cards are cheap; it’s not very expensive to buy enough cards to cover a day of shooting or even several days worth. It can make your shoots run much smoother if you don’t have to capture footage until the end. SD and CF cards have limited capacities so you're not going to be able to record for long periods of time to the cards. SD and CF cards are also slow so when you do capture your footage, it’s not going to be a quick process.
SSDs (solid state drives) are faster than SD or CF cards and have greater storage capacity, but they’re not as cheap. SSDs offer the fastest way to transfer files to backup drives and for editing on your computer because they’re connected via SATA straight into your computer or into an SSD dock (connected via ESATA or Thunderbolt). Not all SSDs are fast enough for raw video capture. Most camera companies have lists of SSDs that are compatible with their cameras on their websites.
Some companies use proprietary camera cards for image capture. These cards contain solid state memory and are comparable in speed to SSDs. While the camera cards cost more than SSDs, you don’t have to worry about compatibility.
All Roads Don't Lead to Rome
How you draw your road map of post production will affect what you’re image quality looks like in the end. Shooting raw is most important if you want the most flexibility when applying effects, the greatest range of possibilities in color correction, or simply, the highest possible image quality. If you don’t maintain all of the color information that was captured when you shot in raw through your post production workflow, you’ll lose the advantages of having shot in raw.
For example: if you shoot in CinemaDNG then transcode that footage to ProRes HQ and edit and export from those transcoded files, then you’ll lose at least half of your color information. This is due to the change in color space. CinemaDNG retains all the color information captured. Your ProRes HQ files are in RGB 422, which is a sub-sampled color space containing about half of the color information of the original CinemaDNG files.
Bit depth is important as well. If you capture footage in 10 bit raw and transcode to 8 bit uncompressed, you’ll lose some of your latitude to alter the footage. In RGB video, 10 bit encoding allows for 1024 steps between a color’s highest and lowest value. Eight bit video only has 256 steps from the brightest level to the darkest level of red, green or blue. Simply converting from 10 bit to eight bit video drastically limits your ability to adjust color and loses your original color depth.
Capture and Transcode
If you shoot on SD, CF or camera cards, you’ll need a card reader to capture your footage. If you shot on an SSD, you can connect via a dock or directly to your computer and start editing although at some point you’re probably going to want to backup your files and clear your camera media for another shoot.
Depending on what format you shot in and what editing software you use, you may have to transcode your footage before editing. If you shot on a 5D Mark III with Magic Lantern, there are a number of free apps you can use to transcode your footage so it can be edited. The Magic Lantern raw footage is 14 bit so it seems unlikely that any major editing software package will add native support. CinemaDNG is supported by some software like Avid Media Composer and Adobe Premiere Pro, but the footage doesn’t always edit easily so some users transcode it before editing. REDCODE has almost universal native support now in professional video editing software and actually works better un-transcoded as it allows you to drop down the preview resolution of the footage you’re editing. This helps your computer to run more smoothly. REDCODE also saves time and storage space, which would be lost to transcoded files.
Get to the Edit Fast

If you shot raw REDCODE or CinemaDNG, you can import those files directly into an editing software that supports them. This gives you the freedom to edit, color correct, add effects and render out all from the same software. It can save you a lot of time and storage space if you don’t have to transcode footage.
There are solutions that allow you to work with different software on the same raw footage without transcoding or migrating timelines. One such solution is the integrated workflow between REDCINE-X and Premiere Pro CC. It allows you to open REDCODE clips from a Premiere timeline in REDCINE-X, make any desired color changes and see the changes automatically update in the Premiere Pro timeline. Solutions like this can give you the controls you want without slowing your workflow down.
Offline Can Be Good
Some editors, when working on projects shot in raw, prefer to edit proxy files. This is where the original files are transcoded to a format that is easy to edit like MPEG-2. These proxies are edited, and then in the finalized sequences, the proxies are replaced with the original files and the final output is rendered. This process, often referred to as offline editing, can dramatically speed up your editing, but it doesn’t allow you to see the full quality of your footage as you edit.
Round Tripping

A popular variation of offline editing called round tripping is when the raw footage is imported to a software for color manipulation like DaVinci Resolve or REDCINE-X; minor color changes are made and a color look (lut) can be applied and then proxy files are exported for editing. These files can be in an intermediate codec like Matrox MPEG-2 I-frame, Apple ProRes or any codec easily supported by the editing software and hardware to be used. The proxy footage is cut in the editing software; then when the edit is finalized, a reference file of the edit, like an XML, is exported. This file is opened in the color manipulation software, the raw media is associated, final color corrections are made and final exporting is done completing the round trip.
Photoshop Your Time-lapse
Photoshop Camera Raw can be used to manipulate raw stills shot in a time-lapse sequence. Stills shot in raw share the same advantages that raw video files have. The stills can be converted to image sequences or video clips and sent to other software for editing.
Editing Systems
What type of computer you use to edit and finish with will also play a part in how you structure your raw workflow. Check your editing software system requirements to see what is recommended for the footage you want to edit. If there are no specs for the raw footage you’re going to edit, then plan on needing similar resources as uncompressed video in the same resolution.
If you’re on a laptop or a mid range desktop, a native REDCODE or offline workflow may work best for you. If you’re on a high-end workstation, then you’re free to edit native raw footage, if possible. However, if you have a lot of footage, editing offline can keep you from filling your media drives with source footage and not having much room for renders.
Media Storage
Even if you’re editing offline, dedicated media storage drives will help speed up your workflow. Using RAID storage for your media can greatly cut down your render times and can allow you to preview REDCODE in higher resolutions while you edit. Don’t forget to plan for backing up your media as part of your raw workflow. You should be accounting for both the time and the resources it will take to do this.
Conclusion: Go With The Flow
To find a raw workflow that’s right for you, think about what will best serve your projects. Remember, it’s not just about what editing software you use. Raw workflow starts at the camera, goes through file capture, image manipulation, editing, finishing and render out. When you get all this hardware and software working toward what you need for your projects, you’ll have a smooth raw workflow.
Sidebar
External Recorders: A Raw Workflow Time Saver
If you’re planning on a raw workflow where you’ll be editing proxy files for an offline edit, an external recorder can create those files for you while you record in camera in raw. There are many external recorders on the market that can record the HDMI output from your camera, and some can be set to automatically start and stop recording with your camera. Even if your camera and recorder won’t sync while shooting, you can sync the video files together in post using automated software like PluralEyes or shoot the slap of a clapboard to give you a manual reference to sync to. If you plan on using the audio tracks to sync your records in post, remember that the camera and external recorder need to have audio feed to them while recording as well as any secondary audio recorder you may use.
Once the proxies are in sync with your raw files, you're free to start editing. When working with hours of raw video files, having your proxies already recorded can save you a lot of time transcoding footage.
Odin Lindblom is an award-winning editor whose work includes film, commercials and corporate video. He has experience shooting and editing raw 4K content.


