
It certainly isn’t as easy as “just shoot against a green sheet and then drop a chromakey effect on the shot in Final Cut.” There are several things in Pre-Production, Production, and Post-Production to keep in mind that will go a long way to selling your green screen shots.
Like Scotch Tape and Kleenex, names associated with cellophane tape and tissue paper respectively, green screen has become the go-to word to describe the filmmaking process where two images are composited together by replacing a solid color background in post-production with a background from a different location, or from something created in the computer. Practically every film or video made today, from Hollywood blockbusters and low-budget Indies to corporate and commercials, has some sort of green screen element. The reason for this rise in popularity can be summed up in one word: Digital.
The Early Days of Compositing

Before digital technology, only big Hollywood films with big Hollywood budgets could do the types of effects that called for compositing two or more elements together in one shot. Back then, the chosen color was not green, it was blue (see sidebar). Although the general system had been in use since the 1930s, the true invention of the blue screen traveling matte process is credited to Lawrence Butler in 1940. Butler used the technique to create the Academy Award winning effects seen in The Thief of Bagdad. Bluescreen and the optical printer were the main tools of the special effects compositing world for decades, until computers and digital filmmaking.
Why Bother?
There are countless reasons to shoot against green, but they all boil down to two categories: either you are trying to realistically place a subject into an environment or you are placing a subject in front of an abstract or graphically driven background. They both have challenges and specific criteria to follow, but I find the latter to be somewhat less interesting than the former. It’s one thing when the subject is clearly keyed over a graphic background. You see that often in corporate interviews, reality TV, the local weathercast and things like that. The bigger challenge is to composite the foreground and background together so well that the audience thinks you got the shot on location.
Let There Be Light

One bad key can ruin the entire composite. A jagged buzz around the edges of the foreground, green fringe in the hair, colored spill on reflected surfaces – all these things destroy the illusion that the foreground and background were shot simultaneously. Preparation and proper lighting on the set will prevent these and other obstacles that can wreak havoc with a good composite.
First, realize that you must light the background and foreground separately. The green (or blue) should be lit as evenly as possible. Avoid wrinkles, seams, cracks or uneven paint on your background. Remember, that you only need to have the green around the foreground subject. There is no need to light a giant green-screen background if you’re only going to be replacing a small portion of it. Also, place your foreground subject as far from the green background as possible. This will limit spill. Spill is when the background color reflects onto the foreground subject. Too much spill will make it difficult to pull a good key in Post and it may also spoil the illusion. Finally, as a general rule, make sure that the light level on the background is lower than the light level on the foreground and avoid a harsh backlight. Some other things to avoid on your subject are: frizzy hair, highly reflective jewelry, and clothing the same color as the background.
Lighting your foreground subject depends entirely on the background plate. Which segues nicely into the next topic.
Background Check
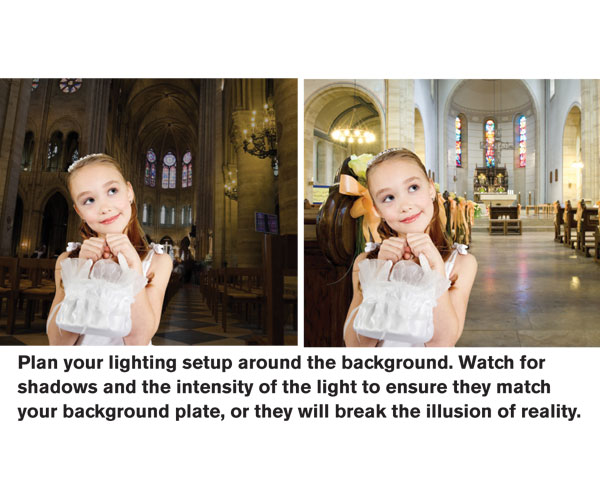
For a completely believable composite it is critical to know your background before you shoot your foreground. So many decisions on the green screen set are based on the background environment. Matching the lighting is the most important piece of the composite puzzle. When shooting the background plates, have a crewmember stand in the area where you plan to place the foreground for a few moments so you can record the way the light falls. Take detailed notes about the lighting conditions, light sources, light color, camera angle and anything else that might help with your green screen shoot. If possible, bring stills of the background to the green screen set with you for comparison.
As an example, let’s say your background is outdoors on the edge of a forest and you need to shoot a person to composite into that environment. What should you consider to help sell the shot? The forest is full of green trees so it will be easier to hide any spill issues if you use a green background instead of blue. Since you will be using green as your key color avoid green in the costume and props.
Check your lighting on the plate. What is the source and where is it coming from? Where do the shadows fall? You must match this lighting in the studio. A small fan to mimic wind blowing the hair will add extra verisimilitude. Another helpful trick is to clamp a tree branch on a C-stand and place it between your key light and subject to simulate the dappled light found in the forest. Those types of details go a long way to sell a composite and hide the fact that you shot the foreground subject in a studio.
One no-no; do not use any diffusion filters when shooting the foreground subject. Diffusion will make it very difficult to get a decent key. Add any diffusion effects in Post. Speaking of Post…
Garbage In The Edit Room
Planning your shots and lighting properly will determine if you spend your edit time enhancing the composite or solving problems and hiding mistakes.
Both Avid Media Composer and Final Cut Pro come with built-in chromakey effects and they are passable for an off-line edit, but for the final composite you should invest in a tool specifically designed for compositing. The most popular is Adobe After Effects. Out of the box, After Effects comes with several very good key effects to choose from, however if you plan to do a lot of green screen work, invest in a chromakey plug-in such as Ultimatte or Primatte.
The most difficult thing to composite is human hair, specifically thin, frizzy, light colored hair, but if you can get the hair to work you’re more than halfway to selling the shot. Ideally, the shoot was lit well enough to allow the software to pull a decent key, but if not, be prepared for some trial and error involving shrinking and blurring the matte to get an acceptable result.
A friend to the good composite is the garbage matte. A garbage matte is a quick mask drawn around a part of the subject. This allows you to use different instances of the chroma key effect on different areas of the foreground. Getting back to hair, it’s very likely that the settings you use to get a quality key around the hair will not work for the rest of the shot. If you isolate the head by using a mask you are free to apply another chromakey effect with different settings to the body. If your subject is moving you will have to keyframe the mask to follow the movement. This technique can help in other trouble areas like a waving hand with motion-blur, a shiny prop that is picking up some spill from the background or a part of the wardrobe that is dangerously close to the colored background.
The Final Check

Once you have effectively keyed the foreground over the background there are a few, final things you should do to really sell the composite. Add a defocus effect to the background to give the shot depth of field. Color correct the foreground so it matches the background. Make sure the brightness and contrast are both correct. The black levels of the foreground should match the black levels of the background.
There are many other, more advanced techniques that you will acquire as you travel down the green screen path, but hopefully these thoughts will be enough to get you started. Good compositing is both an art and a craft that takes years of practice before one is considered competent. The good news is that today’s software and technology allows us to get that practice and build up our experience and our knowledge.
Sidebar: Blue or Green or Green or Blue?
Truth be told, with today’s tools, it doesn’t really matter. In the days of film, blue was used for two reasons. It was a color that is not found in flesh tones and the optical printer needed a blue background in order to generate high-contrast mattes.
With the advent of digital, green became the color of choice because the green channel contains the least amount of noise. Also, green requires less light to get a good key, which makes it a better choice from a time and budget point-of-view.
The choice is really yours. Use your knowledge of the background plate and the foreground subject to make that choice. If your subject has blonde hair, use blue. If your subject is wearing blue jeans use green. The idea is to have a background color that is as far away from the foreground color as possible.
Recently, I had a Director decide at the last minute he needed to composite his actors inside a logo. He did not have a portable green screen so he shot them directly in front of a large red truck. Red is a lousy color to use because flesh tone has a generous amount of red. I was able to pull a good key by using a few advanced tactics and fortunately, I was placing the actors inside a cartoon logo which was more forgiving than placing them in a real environment. But, it does prove that your background color need not be only green or blue.
Mike Sullivan is a Senior Editor/DS Artist for a production company outside Boston.


