
Green screen is a cool technique and it makes movies magical. Everyone knows the special effects and stunts in movies like The Avengers and Spiderman were created using green screen or blue screen backgrounds and computers. Those same digital tools are available in almost all video-editing software and when used properly they create some pretty amazing stunts. The secret for getting believable stunts is to visualize and plan your shots in a very specific way. We’ll review some green screen basics and then show you the simple steps for creating Hollywood-style action in your own projects.
A Quick Review
Before we get started, let’s review the basics. Green screen works because your computer selects a certain color and makes it transparent. So when you use a green screen background, the computer ignores the color green. You then separate the image of your actor (or any other subject) from the background and place it on top of a different background.
Making the green screen transparent is called keying, and combining different images is compositing. The image of your actor is the foreground plate (or element), and the image of the new environment is the background plate. For the rest of this article, we’ll assume you can shoot your subject in front of a green screen, pull a key for the foreground element and composite the foreground and background plates into a single image.
The Secret
The most basic green screen composite (or chromakey) involves a static actor in front of a static background. You see this on television every night when the news composites the weatherman with the next day’s forecast. It’s not a very creative special effect, but it’s the same technology and technique Hollywood uses for green screen movie stunts. So what makes their effects shots different from the evening news? Motion and perspective.
Here’s a secret which allows you to create dynamic action shots with a green screen: break away from static, two-dimensional foreground, and background plates. Just remember your character lives in a three dimensional world, and that world is in motion. Green screen does more than put a cool background behind your character; it places your character in a different and dynamic world. And if you’re designing a stunt, motion and perspective in your composite create the illusion that your character is doing something dangerous.
The Steps

Using motion and perspective when you create a green screen action shot involves four key steps. We’ll examine each of those steps in detail, and then give an example of the process by re-creating a stunt from the classic Alfred Hitchcock film, Psycho where a character falls down a flight of stairs.
Step One: Visualize the Stunt
Before you plan and shoot your elements, you need a good idea of what the final shot will look like. For instance, what’s the character doing? Is Wonder Woman scaling the outside of a building? Is she flying through the air? Is she falling down stairs? As you visualize the stunt, think about how the character moves in relation to the world around her or him. Keep in mind it’s a three dimensional world. Characters in the real world don’t just move left and right, they also move towards or away from the camera.
And how does the world around the character change during the shot? If the hero is flying, clouds and trees zip by beneath him as he soars over the landscape. In the Psycho example, the character moves through space as she stumbles backwards down the stairs. We’ll create this movement in the background plate.
Step Two: Break It Down
Once you know what the shot looks like, figure out how you’re going to shoot each of the elements. What action is the actor performing in front of the green screen? And how do you block and shoot that action? Remember, the only thing that matters is the actor’s image on camera, so you can turn the camera sideways or even upside down to get whatever orientation you need for your shot.
And you have to plan the background plate as well – as your character moves through his or her environment, the background changes. In our example, we want the effect of the ground rushing up towards our actor. We’ll create this effect by moving the camera down the stairs.
Step Three: Shoot the Elements

It’s usually a good idea to shoot the background plate first. That way, you know exactly what the world of your character looks like. Then when you shoot your foreground, you can make sure your actor fits in that world (check if it’s sunny or cloudy, and for any shadows in the actor’s environment). And when you shoot the background first, you can use it for reference on set when shooting your actor.
Pay attention to all the standard rules of green screen techniques when shooting the foreground element (usually your actor). Make sure the screen is evenly lit and watch the boundaries of your green screen; nonetheless, make certain no part of the actor extends beyond the area covered by the screen. Above all, match the lighting environment that exists on the background plate as closely as you can.
Step Four: Create the Composite

The final step in finishing your stunt is creating the composite. If you’ve shot the green screen carefully and can pull a good key, this is fairly straightforward. But there are always details you can tweak. You can change the size of your foreground element by scaling the image up or down. And depending on the nature of the background (and whether it’s interior or exterior), you may want to slightly defocus or blur the background plate. The bottom line is that adjusting each of your elements in subtle ways creates a more convincing composite.
Falling Down the Stairs
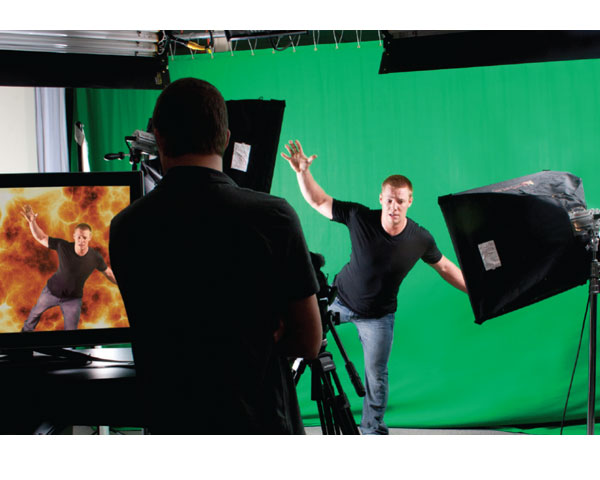
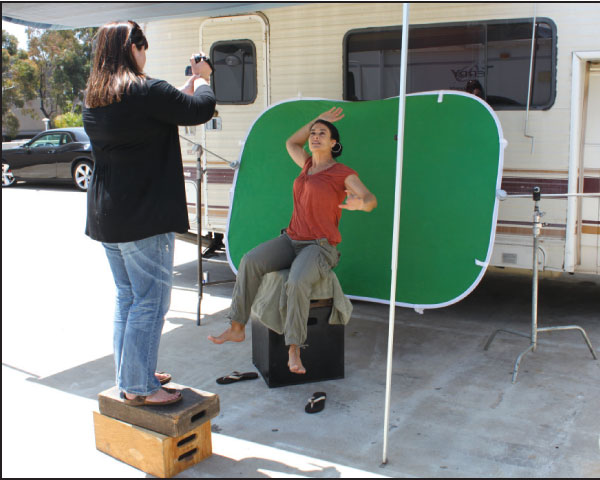
Now let’s look at our example. In the movie Psycho, directed by Alfred Hitchcock, there’s a scene where the character Arbogast (played by Martin Balsam) is attacked by Norma Bates. During the attack, the victim falls and stumbles backwards down a flight of stairs. Rather than shoot this with a stuntman rolling down the stairs, Hitchcock created a special effect where the camera follows Arbogast as he falls. This way, the audience sees the horror on his face after the attack. Hitchcock used rear-screen projection when he shot the stunt, but we created the same effect using green screen. To begin the process, we visualized the stunt. Actually, Hitchcock did this for us – we want the camera following our character as she falls. To create this illusion, we shot a foreground element of our actress losing her balance and a background element of movement down the stairs. Figures 1 and 2 show our director shooting each of those elements.
The final step is pulling the key and compositing the elements. Figure 3 shows a still from the final composite. We made the sequence black and white to match the original stunt. Compare this shot with a still taken from the film, Figure 4. How’d we do?
Go Shoot Some Stunts!
So now you know the secrets and steps for creating exciting stunts and action shots using green screen techniques. Your main challenge as the director is visualizing the stunt in a dynamic way. Remember that appropriate motion and dynamic perspective create visual elements you can weave together in compelling three dimensional composites. But it all starts with visualization; the more creative your initial concept is, the more convincing your final shots.
One final word about safety: With green screen, you create the illusion that your actors are doing dangerous or impossible stunts. Never forget, however, that stunts are simply illusions. Don’t put your cast or crew in a potentially dangerous situation no matter how spectacular the shot you’re imagining. No stunt or effect is ever worth the risk of injury.
Sidebar: Protecting Your Assets
Remember, whenever you’re working with people, whether you’re directing film talent or working with paid crew or volunteers, you must protect yourself and your business from potential litigation or loss. Nearly every business has some form of insurance that covers everything from accidents to theft, but many video producers are sadly under-protected. It’s more than just losing your camera to damage, it’s possibly losing income due to delays, or losing your business due to lawsuits. At the very least, you should have everyone who is working on-camera sign an actor’s release form or a model release form. To protect yourself even more, especially if you’re using people for stunt work, you need some type of film producer’s insurance.
Videomaker has simple model release forms available, and you can read more on the type of insurance a video production business might need in our story Risky Business – Film and Video Insurance feature. For more video production business forms, check out the Videomaker Complete Book of Forms. You can download some parts individually from our website, or the entire book; or receive it the old fashioned way: through the post office.
Sidebar: Going to the Next Level
So far we’ve looked at very simple composites, involving only two elements: the foreground and the background. But composites in Hollywood effects shots often have dozens of elements all layered together in complex visual illusions. Filmmakers often add individual buildings, or other elements, to the background when they create unique locations. And by layering in active elements such as explosions, fire and smoke, they create even more dynamic action shots. Many of these elements are pre-made (sometimes called canned) and already exist within your editing software. You can easily add them to your own composites.
And when you’re using multiple elements within the same shot, it’s important that those elements move in unison as the perspective of the shot changes. This involves an advanced technique called camera movement tracking (or motion tracking), which is generally only available in higher-end compositing programs like Adobe After Effects. If you’re serious about mastering the art of creating complex composite shots, you’ll need to be familiar with motion tracking.
Another advanced technique that helps you pull better keys is the use of a garbage matte. Basically, this is a rough outline drawn around a visual element which blocks out parts of the shot you don’t want to see. Knowing you’ll use garbage mattes in post-production can help you shoot green screen shots even when your screen doesn’t cover the entire background.
Pete Shaner has an MFA in film production from USC and is a Film/Video instructor at the UCLA Extension. A motion-picture writer-director, Shaner’s credits include several independent features, award-winning short subjects, and narrative films. He has written for the TV series JAG and worked as the on-set technical advisor for A Few Good Men.


