
Whether you’re a professional snowboarder reviewing footage to improve your form, or just having a good old fashioned snowball fight, there are a number of ways to capture your moment on the slopes, on the half-pipe, in the backyard or wherever your favorite winter activity takes you. Here are some must-have accessories when hitting the snow this winter and some tips on how to improve your action cam footage and your final edited videos.
IMPROVING YOUR FOOTAGE
All action cam footage and mounts will be useless if not utilized correctly. Here’s how to improve your action cam winter sports footage. Most action cameras have different frame-rate options they can shoot in, so make sure you’ve set your camera appropriately before heading down the mountain. Generally, you’ll want a higher frame rate setting for winter sports — 60 frames per second works great for capturing quick movement. Aside from providing smooth motion, even higher frame rates, such as 120 or 240 frames per second, will allow you to slow the footage down with editing software, so you can watch the snow shooting up in slow motion as you carve through some fresh powder — a must have shot for any winter sport enthusiast.
Action cams tend to capture wide angles, so keep your subjects right there with you — while being safe of course!
POV footage is great, but try to mix in some shots where you film a friend as you follow them skiing down the slope. Think about having your friend ski past you so there is additional movement other than yourself in your shot. When editing your video together, these shots will provide a well needed change of pace from all the first person footage. When filming others, bright clothing goes a long way, considering how bright the environment will be. Try to have your subjects dress in vivid colors. If they are wearing dark colors, you might as well not shoot at all because they will look like a black speck moving through the frame. Yellows, oranges, reds and light blues all work great. One final thing is to make sure your subjects are close. Action cams tend to capture wide angles, so keep your subjects right there with you — while being safe of course!
MUST HAVE MOUNTS – Fat Gecko Kaboom
A great action camera mount for any winter sport is the Fat Gecko Kaboom by Delkin. The Fat Gecko Kaboom is a carbon fiber camera boom that allows the user to capture unique perspectives. The boom acts as a selfie stick, but without the user having to sacrifice the use of one of their arms to hold the stick. The boom, which can be attached to your helmet, can be configured to hang out in front of your helmet allowing for self-portrait shots, capturing your entire body and surroundings in the shot — including, obstacles, jumps or a friend riding behind you. The Fat Gecko Kaboom supports action cameras, point-and-shoots and mirrorless cameras up to two pounds. 

Stealth Mount
Another great mount, in the Fat Gecko family, is the Stealth Mount. The suction cup design allows the Stealth Mount to attach to any smooth non-porous surface – perfect for snowboards or skis. You can angle the mount to face forward capturing extremely low angle shots of any oncoming terrain, ski jumps or grinding rails. Conversely, the stealth mount can be angled toward the user capturing the mountains in the background. 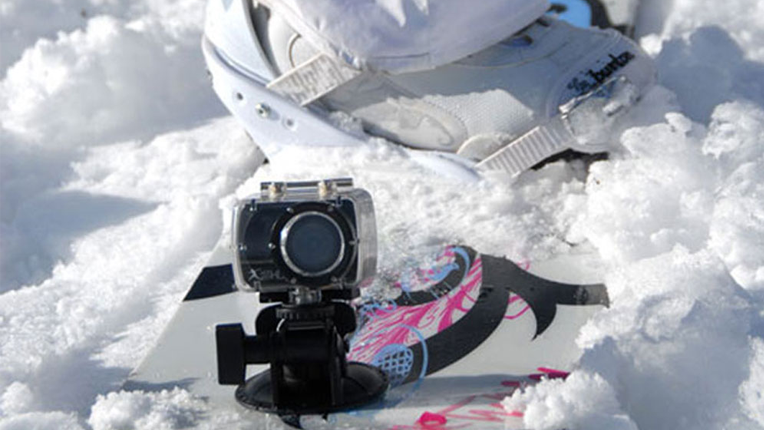

Ski Pole or Selfie Stick?
The perfect action cam mount for skiers would have to be the pole or handlebar clamp — an action camera mount that can be attached to a rounded surface. Skiers will find they get very unique point of views when they clamp an action cam onto one of their ski poles. Since you’re already carrying ski poles, simply attach a camera onto one of them with the pole mount, and now you have a selfie stick. The distinct shots you can capture with a selfie stick consist of third person or over the shoulder, self-portrait and directional first person shots. An advantage of the selfie stick is that you can capture a variety of angles during your ski run simply by changing the way you hold your ski pole.

An Action Cam Mount For Everyone
Don’t have an action cam? No problem. You can still capture great winter sports footage with the Velocity Clip Mount. The Velocity Clip mounts very much like any other adhesive mount, but instead of using an action cam, the Velocity Clip transforms your smartphone into a hands-free POV action cam. The Velocity Clip also has many different accessories including chest, helmet, handlebar, suction cup and pole mount. The overhead of the Velocity Clip is inherently lower since everyone already owns a smartphone, and the clip itself only costs around $40. 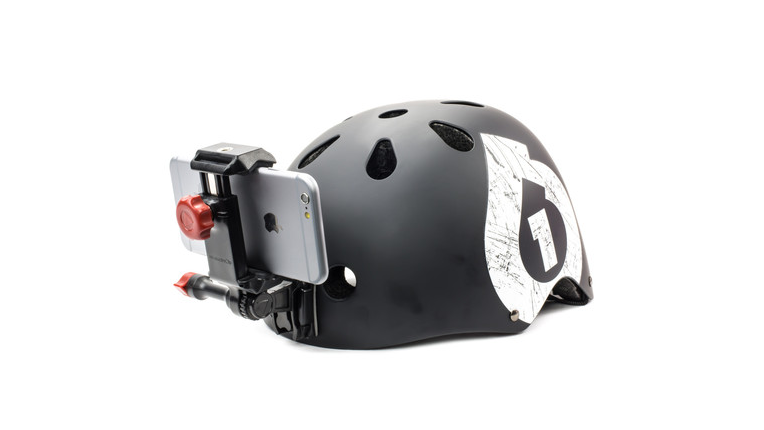
ALL IN GOOD FUN
The end goal is to make a video worth watching. Try to convey a story instead of just a bunch of seemingly random shots mashed together. While editing your video, change the speed of the footage to mix things up. Speed up longer shots, and if you managed to get that great shot while you were carving up the snow, slow it down. Make sure to capture different shot varieties — include some POV helmet footage, third person shots and b-roll of the ski resort or scenery. Don’t spend your whole ski trip worrying about your action cam and trying to get the shots you want. Remember, you are there to have fun!
A freelance producer and director, Devin has produced television advertisements for local and top television markets.


