Here, we’ll discover how proper use of LUTs benefit the production and color grading video editing workflow. In order to understand this article, we suggest you be familiar with or at least have a basic understanding of the following terms:
- 1D and 3D LUT
- Colorspaces such as Rec 709
- Logarithmic Curves/Log profiles
- Raw
- Linear light
There are two primary uses for LUTs.
Technical colorspace transformations convert an image from one color space to another — for example, LogC to Cineon/REDlogFilm or Rec.709 to DCI-P3.
More relevant to this discussion are creative transformations, which are purely creative and intended to produce a subjective look. Any transformation that converts from camera log (or scene-referred) to Rec.709 (or output referred) falls in this category. Creative looks can be created in just about any color correction software, including Resolve, Baselight and Speedgrade among others.
There’s no magic in LUTs.
LUTs aren’t smart. There’s nothing dynamic or changing about them. LUTs contain pre-baked transformations, but the files themselves are ignorant of your source and destination colorspace. They are not algorithms that interpret your footage dynamically.
The mystery and misunderstanding of LUTs seems to have led to high demand of creative LUTs and thus creating a strong marketing strategy for many small companies and colorists to sell grades and looks.
Whether you choose to use a LUT or not depends on your personal choices and workflow as well as the needs of the project.
Whether you choose to use a LUT or not depends on your personal choices and workflow as well as the needs of the project. Typically these LUTs are nothing more than just a basic grade, but they can sometimes be more involved, such as with Film Print Emulations (FPEs). FPEs are very difficult to replicate from scratch. In general, creative LUTs can be useful in a pinch but really aren’t something you necessarily need to spend your money on
Camera manufacturer supplied conversions, such as Log to Rec. 709
These are often free and are released from each camera manufacturer for their log profiles.
ARRI has a LUT generator that’s accessable here.
RED has released a few transforms from REDlogFilm to REDgamma3 and REDgamma4, while a third party has reverse engineered the complete set and produced inverses as well, which can be downloaded here.
These LUTs are purely creative and are basically the camera company’s guess at what they they think will make the footage look best. Many colorists and DP’s reject manufacturer supplied Rec. 709 LUTs because it’s not how they want the final image to look. In the same vein, the common use of these LUTs are why many people are under the impression that each make and model of camera has a specific, inherent “look” – but the purpose of the raw or log capture is to record the scene’s exposure information as accurately as possible.
Scene Referred vs Output Referred
Before going any further, let’s take a look at the differences between scene referred and output referred workflows, two generalized ways of encoding image data.
Scene referred imagery is essentially anything that has a direct correlation to the way light behaves in the real world. However, this is not to say that it is how our eyes respond to and interpret light — only how light itself is measured. If an image is encoded in RAW (literal sensor data) or Log (a compressed and efficient encoding which gives about the same information as RAW) then it is scene referred
Output referred imagery does not carry a relation to real world exposure values, meaning that it’s an interpretation of what is happening.
Two Ways to Grade
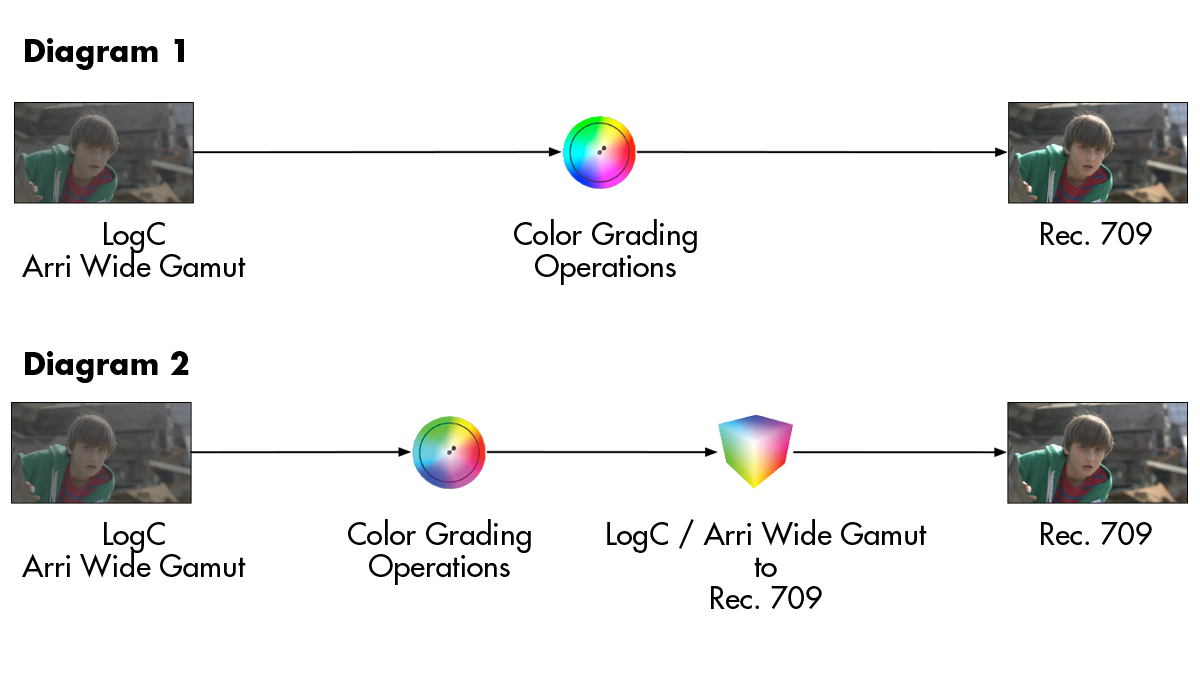
Now let’s look at two ways of grading an image:
In Diagram 1, we are taking a LogC image and viewing in a Rec709 colorspace. The final output is Rec. 709 even though no LUTs were used. This is a perfectly acceptable way of doing things but can limit what you do if you ever have to master in a larger colorspace, and if nothing else, can cost you some time if you ever have to master in another format, especially when other colorists are involved or you don’t have access to the original project files.
In Diagram 2, we have a LogC to Rec709 transform LUT at the end of the pipeline, and we are making grades before (under) this LUT. What’s important to note is that from here you can then turn off your LUT and export a log master, which can help you down the line.

Advantages to Grading in Rec709
While they may not fit your intended look, a log to Rec. 709 Colorspace Transform LUT can be useful for the following reasons and it can greatly speed up your pipeline from on-set production to post.
Exposure – On set, you really shouldn’t be viewing your image in log. To start, log images look nothing like reality. A camera sees things linearly while our eyes see things non-linearly. This is an easy way to under or overexpose, or to add too much contrast to your scene, which is why you always want to be viewing with a LUT. Luckily for you, all cinema cameras have a Rec. 709 LUT built-in that can be toggled on and off. Just make sure you are using it as a viewing LUT only and aren’t baking it in on set.
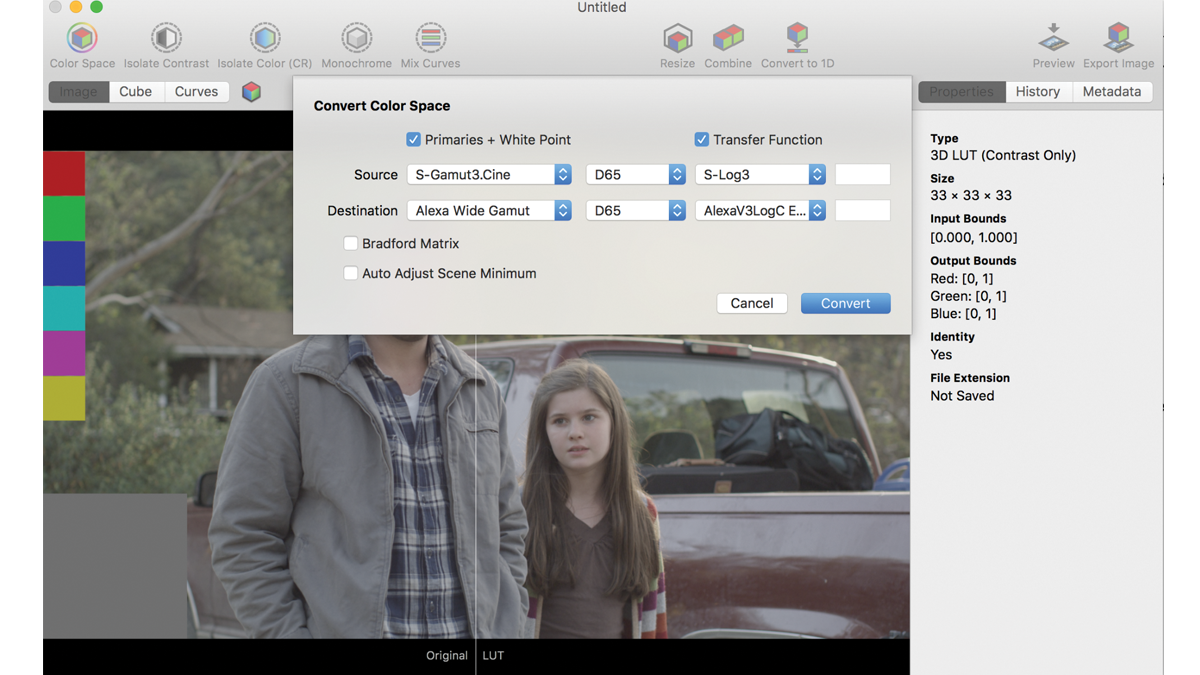
Mixing formats – Say you’re mixing footage from multiple cameras in the same timeline, and you’re looking for a quick way to get all the footage to look similar before you begin grading. You can convert one camera manufacturer’s log profile into other camera manufacturer’s log curves using LUT applications such as Lattice or LUTCalc. In a similar fashion, you can achieve this using Resolve’s Davinci Color Management, or the Academy’s ACES workflow, CTLs or other color transforms built into your grading software.
Basically these programs work to transform documented colorspaces, which are available as preset dropdowns in their menus.

How can a custom made colorspace conversion LUT help you? Let’s say you’re grading footage from a live concert, primarily shot on ARRI Alexa in LogC. From this concert, there is also footage from a Sony F5 shot in Slog3. Even if the two cameras were exposed identically, their encoded images differ. Therefore, a creative grade you make on one camera’s footage will yield different results on the other camera’s footage.These two log profiles wouldn’t allow you to easily copy grades from one shot to another while maintaining consistency.
Here’s where a LUT can help:
You can then use Lattice or LUTCalc to easily create a LUT that transforms Sony’s Slog3 to LogC. Using this method, you can place your conversion LUT as an input LUT (prior to any creative grading) for the Slog3 footage, then view all of your footage under the same output LUT which, in this case would be ARRI’s LogC to Rec709 (K1S1) or another LogC to Rec709 creative LUT. It’s important to note, that this will not improve the dynamic range of the footage, nor remove gamut clipping in the camera with the smaller gamut. It does help to normalize the cameras so that grades can be easily copied within the limitations of the cameras and encoded footage.
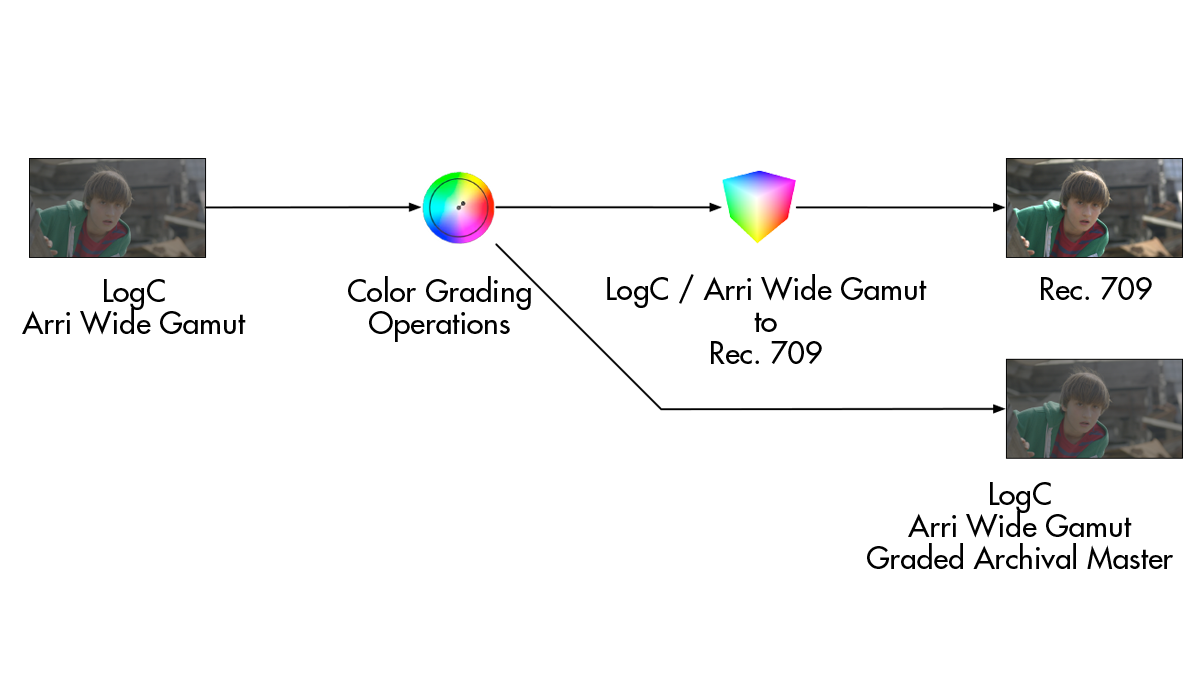
Archival – If you work with an output referred LUT at the end of your pipeline, you can easily futureproof your projects by bypassing the LUT and exporting a graded log master.

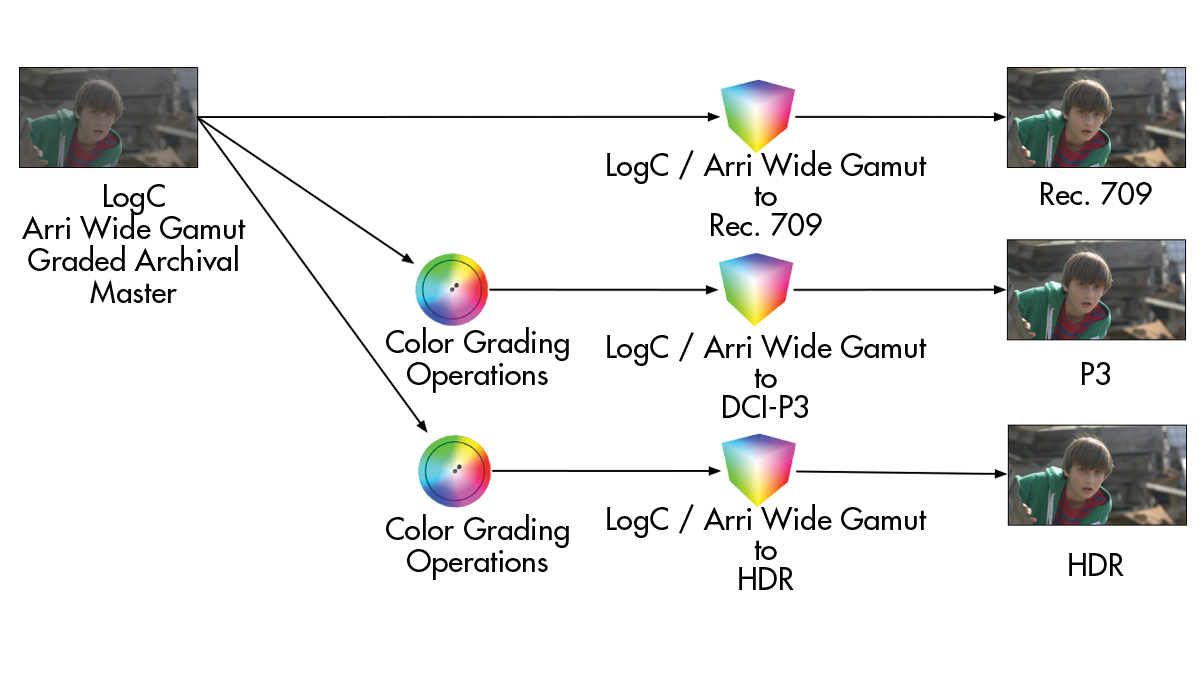
By exporting a graded log master, you effectively future proof your project in the event you need to convert your project to new color spaces later on. What’s great about this workflow is that you not only save the grades, but you also save all or most of the original dynamic range in the image, which you’ll want if you are to make a transform to a colorspace that holds more dynamic range than the Rec. 709 version.
For example, you can already transform your final Rec 709 export to larger colorspaces, but even though the colorspace is larger, converting won’t actually bring more of the original information out of your footage. However, if you were to perform the transformation on the log master, you’d be able easily make HDR, EDR or Rec.2020 versions and access most or all of the original dynamic range and color info of the original footage.

Conclusion
Creative LUTs can be an incredibly useful tool in your arsenal. LUTs aren’t limited to just getting you a quick grade, but can help normalize footage between two cameras. LUTs can be an invaluable way to assist in exposure in camera and on set. LUTs can also improve your workflow when it comes to archival purposes as you can make a log master that includes the grade without the LUT, which is useful for making transforms to future colorspaces, or when working in collaboration with other colorists.
Steven Wetrich is a freelance DP and colorist working in the LA Area.


